Python Logging Guide: The Basics

Arfan Sharif - February 3, 2023

Once your Python programs grow beyond basic scripts run from a command line, using print() statements for logging becomes a difficult practice to scale. Using print()logging modules enable you to better control where, how, and what you log, with much more granularity. As a result, you can reduce debugging time, improve code quality, and increase the visibility of your infrastructure.

To help you get up to speed with Python logging, we’re creating a multi-part guide to cover what you need to know to make your Python logging efficient, useful, and scalable. To get the most out of this guide, you should be comfortable with basic Python programming and understand general logging best practices.

In part one of our overview on Python logging, we’ll introduce you to the default logging module and log levels, and we’ll walk through basic examples of how you can get started with Python logging.

Learn More

Explore the complete Python Logging Guide series:

Python’s default logging module

The first step in understanding Python logging is familiarizing yourself with the default logging module, which is included with Python’s standard library. The default logging module provides an easy-to-use framework for emitting log messages in a Python program. It’s simple enough that you can hit the ground running in a few minutes and extensible enough to cover a variety of use cases.

With the default Python logging module, you can:

  • Create custom log messages with timestamps
  • Emit logs to different destinations (such as the terminal, syslog, or systemd)
  • Define the severity of log messages
  • Format logs to meet different requirements
  • Report error suppression without throwing an exception
  • Capture the source of log messages

How does Python’s default logging module work?

At a high level, Python’s default logging module consists of these components:

  • Loggers expose an interface that your code can use to log messages.
  • Handlers send the logs created by loggers to their destination. Popular handlers include:
    • FileHandler: For sending log messages to a file
    • StreamHandler:For sending log messages to an output stream like stdout
    • SyslogHandler: For sending log messages to a syslog daemon
    • HTTPHandler:For sending log messages with HTTP
  • Filters provide a mechanism to determine which logs are recorded.
  • Formatters determine the output formatting of log messages.

To use the default logger, just add  import logging to your Python program, and then create a log message.

Here’s a basic example that uses the default logger (also known as the root logger):

python logging root logger example code

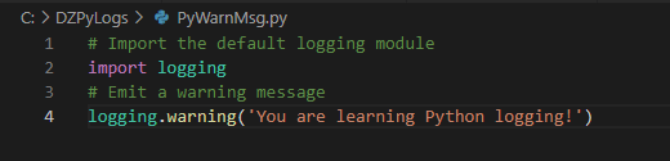
Running that code will print this message to the console:

WARNING:root:You are learning Python logging!

In that example, we can see the default message format is as follows:

<SEVERITY>:<NAME>:<MESSAGE>

<NAME>is the name of our logger. 

In many cases, we’ll want to modify how messages are formatted. We can call basicConfig() at the beginning of our code to customize formatting for the root logger.

For example, suppose we want to add a timestamp to our message. We can add %(asctime)s to a basicConfig() format call. To retain the rest of our original formatting, we’ll also need to include %(levelname)s:%(name)s:%(message)s.

Our resulting code will look like this: 

# Import the default logging module
import logging

# Format the log message
logging.basicConfig(format='%(asctime)s %(levelname)s:%(name)s:%(message)s')


# Emit a warning message
logging.warning('You are learning Python logging!')

The output should look similar to the following:

2022-11-11 11:11:51,994 WARNING:root:You are learning Python logging!

Creating a custom logger

What if we don’t want to use the root logger?

In that case, we can create our own logger by setting a logger = value and defining the settings of our logger (remember, basicConfig() is only for the root logger). For example, the script below creates a HumioDemoLogger set to log INFO-level messages with the same formatting as our previous example.

# Import the default logging module
import logging

# Create our demo logger
logger = logging.getLogger('HumioDemoLogger')


# Set a log level for the logger
logger.setLevel(logging.INFO)


# Create a console handler 
handler = logging.StreamHandler()


# Set INFO level for handler
handler.setLevel(logging.INFO)


# Create a message format that matches earlier example
formatter = logging.Formatter('%(asctime)s - %(name)s - %(levelname)s - %(message)s')


# Add our format to our handler
handler.setFormatter(formatter)


# Add our handler to our logger
logger.addHandler(handler)


#  Emit an INFO-level message
logger.info('Python logging is cool!')

When you run the script, the output should look similar to the following:

2022-11-11 11:11:38,525 - HumioDemoLogger - INFO - Python logging is cool!

Python logging levels

If you’re familiar with the Syslog protocol, the idea of logging levels and log severity should be intuitive. In short, log messages generally include a severity that indicates the importance of the message.

There are six default severities with the default Python logging module. Each default severity is associated with a number, and a higher numeric value indicates a more severe logging level. The table below describes each of the default logging levels.

Default Python logging levels

LevelNumeric ValueDescription
Critical50Highest severity messages; may cause a program to crash or exit.
Error40High severity messages generally related to an operation failing that does not cause the program to crash or exit.
Warning30Potentially negative events that may cause abnormal operation or otherwise require attention (such as the use of a deprecated API).
Info20Messages that log standard/expected events.
Debug10Messages useful for debugging how an application is running.
Notset0Default level when a new logger is created. Setting the root logger to NOTSET logs all messages. For other loggers, NOTSET messages are delegated to parent loggers until a level other than NOTSET is found.

Expert Tip

Avoid creating custom log levels. You can define your own custom log levels, and that’s where the numeric values come in. The higher the numeric value of your custom log level, the more severe it is. For example, a value of 60 is treated as more severe than CRITICAL-level messages and a value of 35 would be between INFO and WARNING in severity. However, it’s usually not necessary to create custom levels, and the official Python docs make that clear. We recommend sticking to the defaults.

It’s important to understand that the logger will log everything at or above the severity it is set to. The default configuration is set to log WARNING-level messages, so let’s see what happens when we create a message with a severity of INFO.

# Import the default logging module
import logging


# Emit a warning message
logging.info('Keep going, you are doing great!')

When we run our script, we notice that this message, as expected, doesn’t print to the console.

If we want to log INFO-level messages, we can use basicConfig() and set level=logging.INFO.

The new code will look like this:

# Import the default logging module
import logging


# Format the log message
logging.basicConfig(level=logging.INFO)


# Emit a warning message
logging.info('Keep going, you are doing great!')

The output will look similar to the following:

INFO:root:Keep going, you are doing great!

Sending Python logs to different destinations

Thus far, we’ve emitted our log messages to the console. That’s great for local debugging, but you’ll often need to send logs to other destinations in practice.

Later in our Python Logging Guide, we’ll cover more advanced topics like centralized logging and StreamHandler for Django. For now, we’ll focus on three common use cases:

  1. Logging to a file
  2. Logging to syslog
  3. Logging to systemd-journald

Sending Python logs to a file

If you want your Python app to create a log file, you can use the default logging module and specify a filename in your code. For example, to make our original WARNING-level script write to a file called HumioDemo.log, we add the following line:

logging.basicConfig(filename='HumioDemo.log')

The new script should look like this:

# Import the default logging module
import logging

# Set basicConfig() to create a log file
logging.basicConfig(filename='HumioDemo.log')

# Emit a warning message
logging.warning('You are learning Python logging!')

Nothing will print to the console when you run that script. Instead, it will create a HumioDemo.log file in the current working directory, and this file will include the log message.

Sending Python logs to syslog

Syslog is a popular mechanism to centralize local and remote logs from applications throughout a system. The default Python logging module includes a SysLogHandler class to send logs to a local or remote syslog server. There’s also a standard syslog module that makes it easy to write to syslog for basic Python use cases.

Here’s a script that uses the standard syslog module:

# Import the standard syslog module
import syslog

# Emit an INFO-level message
syslog.syslog(syslog.LOG_INFO,'Logging an INFO message with the syslog module!')

# Emit a WARNING-level message
syslog.syslog(syslog.LOG_WARNING,'Logging a WARNING message with the syslog module!')

After running that script, you should see messages in the system’s local syslog file. Depending on your system, that file might be /var/log/syslog or /var/log/messages. Log messages will look similar to the following:

Nov 11 11:11:16 localhost syslog.py: Logging an INFO message with the syslog module!
Nov 11 11:11:16 localhost syslog.py: Logging a WARNING message with the syslog module!

Sending Python logs to systemd-journald

Logging with systemd-journald has several benefits, including:

  • Faster lookups thanks to binary storage
  • Enforced structured logging
  • Automatic log rotation based on journald.confvalues.

On most modern Linux systems using systemd, if your Python app runs as a systemd unit, whatever it prints to stdout or stderr will write to systemd-journald. That means all you need to do is send your log output to stdout or stderr.

In addition to modules included with the standard Python library, the python-systemd library and wrappers like the Python systemd wrapper help streamline the process of sending Python logs to systemd-journald.

For example, to use python-systemd, first install it using your system’s package manager. Then add the following line to your code:

from systemd import journal

Here’s a simple Python script that writes a WARNING-level message to journald.

import logging
from systemd import journal
logger = logging.getLogger('humioDemoLogger')
logger.addHandler(journal.JournalHandler())
logger.warning("logging is easy!")

After running the above script, we run journalctl and see output similar to:

Nov 11 11:11:57 localhost pylog.py[2111]: logging is easy!

Best practices for emitting Python logs

At this point, you should be able to implement basic logging for your Python applications. However, there is plenty more to learn about the standard logging module. Reading PEP 282, the official Advanced Tutorial, and Logging Cookbook are great ways to dive deeper.

As you progress, keep in mind the following best practices:

Include timestamps with your messages

When is a critical part of an event. Therefore, you should include a timestamp with every message you emit. With the default logging module, you can add a timestamp to your formatter, as we did with  %(asctime)s in our earlier example. You can further customize it using formatTime.

Have a mechanism to rotate logs

If you store logs on disk, then have a log rotation strategy to avoid disk space issues. With the default Python logging module, consider using the RotatingFileHandler class.

Don’t instantiate logging modules directly

Instead of instantiating logging modules directly, use logging.getLogger(name). The default module naming hierarchy is similar to Python’s package hierarchy, and it’s exactly the same if you name loggers after their corresponding modules, as the docs recommend.

Centralize your logs

Multiple log files scattered across multiple systems can become almost as unwieldy as those print() statements we originally wanted to get rid of. Centralizing your logs for parsing and analysis gives you observability at scale.

What’s next?

You now know the basics of Python logging. In part two, we’ll explore more advanced topics such as:

  • Configuring multiple loggers
  • Understanding exceptions and tracebacks
  • Structured vs unstructured data, and why it matters
  • Using python-json-logger

Log your data with CrowdStrike Falcon Next-Gen SIEM

Elevate your cybersecurity with the CrowdStrike Falcon® platform, the premier AI-native platform for SIEM and log management. Experience security logging at a petabyte scale, choosing between cloud-native or self-hosted deployment options. Log your data with a powerful, index-free architecture, without bottlenecks, allowing threat hunting with over 1 PB of data ingestion per day. Ensure real-time search capabilities to outpace adversaries, achieving sub-second latency for complex queries. Benefit from 360-degree visibility, consolidating data to break down silos and enabling security, IT, and DevOps teams to hunt threats, monitor performance, and ensure compliance seamlessly across 3 billion events in less than 1 second.

Schedule Falcon Next-Gen SIEM Demo

GET TO KNOW THE AUTHOR

Arfan Sharif is a product marketing lead for the Observability portfolio at CrowdStrike. He has over 15 years experience driving Log Management, ITOps, Observability, Security and CX solutions for companies such as Splunk, Genesys and Quest Software. Arfan graduated in Computer Science at Bucks and Chilterns University and has a career spanning across Product Marketing and Sales Engineering.